Showing posts with label Sweet. Show all posts

Monday, October 5, 2009

Thomas Keller TKO Cookies

These cookies are sold at Thomas Keller's Bouchon Bakery in Yountville, California, and are so delicious, I'm surprised how simple they really are. The salty, sandy cookie is perfect on its own, if you don't want to bother with the white chocolate filling.

I only had one complaint about these cookies when purchased fresh from the bakery: They were too large -- about the size of an English Muffin! That actually makes them too sweet as they don't divide easily, so you're essentially eating three very sweet cookies in one. By making your own, you can select the size of your choosing.

Cookie

1 1/2 cups plus 3 tbsp AP flour
3/4 cup sugar
3/4 cup plus 1 tbsp unsweetened cocoa powder
1/2 teaspoon baking soda
1 1/2 teaspoons salt
15 tablespoons unsalted butter, cut into 3/4-inch cubes, at room temperature

Filling

1/2 cup heavy cream
8 ounces white chocolate, chopped


Directions:

For the Filling: In a small pan, bring the cream to a boil. Remove from heat and add the chocolate. Let stand for 1 minute, then whisk to melt the chocolate until smooth. Transfer to a small bowl, and let stand for at least 6 hours to thicken up.

For the Cookies: In a large mixing bowl, combine the flour, sugar, cocoa, baking soda, and salt, and mix on low speed. With the mixer running, add the butter, a piece at a time. The mixture will be dry and sandy at first, but over 2 minutes, will form pebble-sized pieces that start to cling together. Stop the mixer and transfer the dough to your board.

Preheat oven to 350°F.

Separate dough into 2 pieces. Roll each piece of dough between 2 pieces of plastic wrap or parchment paper to 1/8" inch thick. Using a cookie cutter, cut into rounds. Scraps can be pieced together and rolled out again. Place 1/2" apart on baking sheets lined with Silpat liners or parchment paper.

Bake for 12-15 minutes, rotating halfway through baking. Remove and cool in the pan for 5 minutes, then transfer cookies to a cooling rack. Cool completely.

To Assemble: Lightly whip the white chocolate cream to aerate and fluff up. Transfer filling to a pastry bag fitted with a 1/4" plain tip. Pipe about 1 1/2 tsp in the center of half the cookies. Top with another cookie to sandwich. Gently press down until the cream comes to the edges.

Cookies can be stored in a container for up to 3 days. Loosely cover.

Monday, August 10, 2009

Nectarine Raspberry Cream Pie


I had nectarines going soft. I had raspberries. I had crust. I wanted pie. I searched and found this rather interesting sounding pie which uses cream, but in a baked base. Intrigued, I made it. I think this recipe has definite possibilities, because it was interesting and tasty, but, I wasn't too fond of the rather undercooked base. If I had left this in my oven until it was browner, I think it would have been more the texture of a clafouti, and less the texture of slightly undercooked cake. Still, it was very pretty and tweaking the baking time would have made it perfect. I skipped the entire boiling/skin removal process and this made the pie come together really quickly. My notations and adaptions are shown.


NECTARINE CREAM PIE
  • 2/3 cup white sugar (I always add sugar to taste; I only added 4 tablespoons)
  • 4 tablespoons all-purpose flour
  • 1/2 teaspoon ground cinnamon (I also added 1/4 teaspoon ground nutmeg and 1/4 teaspoon ground vanilla bean)
  • 1 cup heavy whipping cream
  • 1/4 teaspoon almond extract
  • 5 nectarines (I used four nectarines, quartered, and 1 cup of frozen black raspberries)
  • 1 (9 inch) unbaked pie shell
Preheat oven to 400 degrees F (205 degrees C). Place a large pot of water over high heat, and bring to a boil. Combine sugar, flour, cinnamon, nutmeg, heavy cream and almond extract. Set aside. Place the nectarines in boiling water for 30 to 45 seconds. Immediately place nectarines under cold running water and remove skins. (I skipped the boiling process entirely because nectarine skins are edible). Cut nectarines in half and remove pits. Place halves in the pie shell with the cut side down. (I did this, but quartered the nectarines, and, added a cup of frozen raspberries). Pour the cream mixture around the nectarines.

Bake at 400 degrees F (205 degrees C) for 35 to 40 minutes. Good served warm or cold.

Sunday, May 10, 2009

Banana Blueberry Breakfast Bread


Banana Blueberry Breakfast Bread. That's a lot of B's. This bread was totally worth the experiment it involved.

I started with my standard breakfast bun recipe which I created with the Stealth Cinnamon Rolls from earlier this week. Since I halved that recipe, I was left with a half a box of yellow cake mix, and I wanted to see if my theory, that this recipe would make a great yeast bread, was a good one. It was. In fact, it made a better loaf bread than it did rolls.

When I made the cinnamon rolls, I didn't trust how "wet" the dough was and I added as much as an additional cup of flour to the "half" recipe, and the rolls, while still high and tasty, were somewhat dry and more bread than pastry-like. This time, I resisted the urge to add more flour and just let the wet dough raise on its own without my interference, and I'm glad I did. It turned out just fine, and was moister than the rolls.


BASIC BREAKFAST BREAD

This recipe is for ONE LOAF -- a half recipe.

1/2 box of yellow cake mix (no pudding in the mix)
1-1/4 cup of warm water
1 package of yeast
3 cups of flour
1/2 teaspoon of salt

Mix all ingredients thoroughly. Allow to double in volume. Punch down, and stir in any mix-ins, or, roll out on a chopping board, layer toppings, and roll up. Add to a buttered loaf pan, allow to double in volume again, and bake for 20 minutes at 375 degrees.

For this variation of the basic bread, I used my bread machine to mix the dough, only. At the "fruit and nut beep" I added 2 big handfuls of Trader Joe's Freeze Dried Blueberries, and 1 big handful of Trader Joe's Freeze Dried Banana Slices, and 1 big handful of chopped walnuts. I crushed more dried blueberries for the top of the loaf (which was really pretty, like painting with water colors). I then took it out of the machine and kneaded and raised it myself, in a loaf pan, before baking.

This particular loaf would have tasted great with a lemon cake mix, but I was using up the 1/2 box left from the cinnamon rolls. I let the loaf raise, baked it off, and sliced. It was just perfect. This bread is not "too too" sweet, it's closer to Hawaiian Sweet Bread. It made EXCELLENT toast -- really superb toast, in fact. 

As pictured, though, I've spread some Lemon Quark on a slice, which was also top notch. Quark is a much lower fat and creamier, lighter version of ricotta or mascarpone.  Many compare quark to cream cheese but quark is much "fluffier."  I get mine from a Farmer's Market in both Vanilla and Lemon flavors. Lemon Quark on Blueberry Banana Bread Toast was really fantastic.  

I buy mine from Spring Hill Cheese Company based in Petaluma, California, which sells it at Farmer's Markets, but it looks like you can get it mail order -- which has to be a little costly because it's perishable -- but if you have to go through life without trying their Vanilla Bean or Lemon Quark, it just may be a sacrifice you have to make.

Thursday, May 7, 2009

Stealth Cinnamon Rolls


I'm calling these Stealth Cinnamon Rolls because I'll bet you don't realize you've got every single ingredient for these, in your pantry, most of the time. I saw the recipe and thought "You know, I could make those right now!" and I did. The concept is interesting, and I immediately thought of several variations on the theme, as shown below.


CAKE MIX CINNAMON ROLLS

  • 1 box of yellow cake mix (no pudding in the mix)
  • 2.5 cups of warm water
  • 2 packages of yeast
  • 1 teaspoon of salt
  • 5 cups AP flour

Mix all ingredients thoroughly. Allow to rest and raise, doubling in size, for approximately 1 hour. Roll out, spread thickly with butter, and sprinkle thickly with cinnamon and sugar. Roll up on the long edge, cut into 1 inch spiral rolls, and set in pan, or in muffin pans. Allow to raise a second time, approximately 1 hour. Bake at 350 degrees for 20 minutes. Ice with glaze of your choice.


I halved this recipe, and found the dough so sticky, I kept adding more flour to get it to come together in a soft ball. As much as a cup more flour than I thought. I think may have lead to the rolls being more bread and less pastry like, but they were still soft and tasty. Next time, I'll trust the sticky dough and leave it alone. Still it was so simple. I added ground vanilla powder to the cinnamon sugar mixture, but not nearly enough butter -- they were cooked perfectly throughout, but I like a bit more moisture in the rolls, so next time I'd use more butter and maybe bake them 5 minutes less. Otherwise, they rose high and light. HALF of this recipe made a full 13x9 pan, so if you used the recipe as written, you'd get a bunch of rolls for sure.


VARIATIONS I'VE CONSIDERED:


Red Velvet Cake Mix + Cream Cheese Filling


Chocolate Cake Mix + Coconut Pecan Nutella Filling


Lemon Cake Mix + Citrus or Coconut Filling, or Blueberry or Poppyseed


Spice Cake Mix + Nut Filling


Carrot Cake Mix + Cream Cheese Filling


White Cake Mix + Almond Extract + Chopped Cherry Filling


Ooh, the possibilities of fast breakfast rolls!


Sunday, March 15, 2009

Fail: Cold Oven Pound Cake


This wasn't a success. America's Test Kitchen, you've disappointed me -- but so did my oven, so I think it's a little of both reasons.

This vintage recipe assured me that I'd have a light, fluffy, not-dense pound cake using a retro method of placing the batter in the pan, and into a stone-cold oven, and then letting it come up to temperature and baking one hour.

The *taste* of the batter was okay, but I followed it to the letter and saw my first problem almost immediately. I used the exact quantities called for in a recent The Best of America's Test Kitchen magazine 2009, and it prominently states that after scooping the batter into the pan, you should "smooth the top." My batter was so loose and runny, there was NO smoothing necessary at all, and in fact, it seeped out of the seams of the removable bottom for the angel food cake pan I was using. I quickly poured the batter back into the mixer, including using a knife to dredge it off my counters and back into the bowl (no lie), and then slowly added flour until it was less runny. Back into a freshly dredged pan, and then into the cold oven.

The instructions then warned me: Do NOT open the oven for one hour. Okay, okay. But, the problem is, after 15 minutes, I smelled too-baked cake. It was nice smelling, but far too toasty smelling to be normal after 15 minutes, so I opened the door, anyway. Good thing I did. The cake was dripping out of the angel food cake pan bottom and onto the floor of my oven. NICE. That's gonna be a bitch to clean. I quickly placed a pan under it and let it finish without disturbing it. Looked crappy anyway.

After one hour, the cake was done, and I eventually cooled it and then coaxed it out of the pan. I was amazed it wasn't adhered to the pan since it had baked into the seams of the removable bottom. The cake was not light and fluffy (my added flour?). It was tasty, but it was rather dense and a little too gummy for my taste. I took it into work and it was devoured in a few hours, but to me, this is not a signature pound cake recipe and I won't try it again.

The search for good pound cake continues.
Use it Up Points:
None, really, I had all the ingredients but they were not dated or needing to be cleared away. I just made use of what I already had instead of buying pound cake.

Monday, March 2, 2009

Big Red Kitchen's Two Ingredient Pumpkin Cake and Three Ingredient Glaze

... except I used three ingredients in the cake, and a few extra ingredients in the glaze. Oh, and no pumpkin. I couldn't help myself.

I've long admired the concept of "Cooking the Books: A Cook Through Blog Roll" which seeks those committed enough to cook their way through an entire cookbook. I've long wanted to do this, and I even challenged myself with a vintage cookbook by Margaret Rudkin, and yet here I am, reading other blogs, and cooking from those blogs or from Tastespotting and from random Google searches.

Robin Sue of Big Red Kitchen has taken that Cooking the Books concept and is "Cooking the Blogs" -- an equally good idea, and a plan I recognized I was more likely to adopt. So, it seemed fitting I start with a recipe from Robin Sue's blog, and since one of her most popular recipes (see her sidebar) happens to fit in with my current plan of cleaning out my pantry and not doing any grocery shopping this month (I allow myself to buy only dairy, veggies, and fruit when I'm in "Use It Up Mode), it suited me perfectly.

In Robin Sue's recipe, she uses one cake mix and one can of pumpkin, mixed and baked, and nothing more, for the cake, and then a simple 3 ingredient apple cider glaze. I adapted it only slightly, and had amazing results. Not because of my adaptations I assure you -- the recipe is fine in its original form. I just was very skeptical I'd like the end product.
You see, I've had the "Diet Soda Cake" where you are guaranteed a lower fat, lower sugar cake if you just combine one can of diet soda pop and one cake mix. It was, in a word, ATROCIOUS. Heavy, wet, gummy, metallic. I still shudder.
Here I was, though, with a cake mix and a box of frozen butternut squash puree, and a raining-so-hard-it's hailing-Sunday afternoon.

I decided I was going to make a cake and watch DVR reruns of The Office. I did exactly that.

Butternut squash is often interchangeable with pumpkin puree (indeed, many commercial pumpkin pies are actually butternut squash, I'm told), so I defrosted a brick of it, and added it to a Duncan Hines French Vanilla Cake Mix, and combined thoroughly. I noted others remarked on the batter being the consistency of brownie batter, and I was not trusting enough to leave it alone. I don't like heavy, gummy cake, and since I had out the jar of apple juice (for the glaze) anywayyyyyyyyyyyy, why not? I added 1/4 cup of apple juice to the pumpkin-cake mix, and beat it until it was smooth. I poured it into a greased and floured rectangular cake pan and baked it for 30 minutes.

I was still not trusting, as I made the glaze. For the glaze, I combined 1 cup of powdered sugar, 2 tablespoons of apple juice, and a scant few shakes of Pumpkin Pie spice, and beat it thoroughly. To me, most powdered sugar glazes taste like raw powdered sugar and I always strive to avoid that. I didn't care for the sugary taste, but liked the flavor overall, so I tarted it up by adding a splash of lemon juice. That helped considerably, but it was still too powdery-sugary tasting. I added 1/4 teaspoon of corn starch, and quickly brought the glaze to a bubble in a sauce pan, and immediately took it off the stove to cool. That did it. It took away the "raw taste" and turned the glaze into a thick, glossy glaze with the consistency of honey.

The cake was now cool, and I cut into it. It was not gummy or wet, as Robin Sue promised. It was actually so light, so fluffy, it was almost TOO tender. If I could describe it as anything it would be "a cake of soft baby powder and fog." It was powdery soft, and absolutely wonderful. The flavor was like a mild pumpkin pie in cake form, and with a drizzle of the glaze, it was quite tasty. A sure fire easy cake for a pot luck or unexpected guests for breakfast, and, bonus -- it's lower fat than had you made the cake or the pie in the traditional manner, and, the pumpkin and squash are super foods, which officially makes this HEALTH FOOD.

Two thumbs up, Robin Sue!


CAKE

1 cake mix of your choice
1 regular can of pureed pumpkin or butternut squash

Mix thoroughly. Add apple juice to thin, if desired. Pour into buttered, floured, rectangle cake pan and bake at 350 for 30 minutes, or until a cake tester comes out clean.

GLAZE

1 cup of powdered sugar
2 T of apple juice
1 shake of pumpkin pie spice
1 splash of lemon juice
1/4 teaspoon corn starch

Mix thoroughly, heat to a bubble, remove from heat, stir, and let cool. Drizzle on your cake. 

Sunday, February 15, 2009

What should I make with Dark Chocolate Pearls?

For Valentine's Day, my sweetie gave me Chocolate Pearls, times two. The first, a five strand necklace of Chocolate Freshwater Pearls (huzzah!!) and the second, a container of Bittersweet Dark Chocolate Pearls by Ginger Elizabeth Chocolates, a chocolatier in Northern California (the picture above is of Godiva Chocolates because I'm too lazy to take one of my own by Ginger Elizabeth, but I'm hereby thanking Godiva by giving them a plug).

The five-strand necklace, yes, I've been fingering that lovingly all weekend. The candy pearls, I've tasted a few, but even he knew that giving me the chocolate was mostly just a very cute and charming lead in, because I just don't go cuckoo for chocolate candy really. He just thought, and he was right, that "I bought you some Chocolate Pearls" had great possibilities for comedy and romance.

So I'm thinking -- am I totally nuts to just bake these into something fun? Or is that ruining quality chocolate. I just don't have taste buds refined enough to say "Oh these are just exquisite" and yet I do think they taste good and have an interesting texture.

But I'm me. And me -- I've had a 5 lb bag of Nestle's Tollhouse Chips in my freezer for months, and I'm never even tempted to open it. I made a batch of chocolate chip cookies for my brother, at Christmas, but only because my mother made me. He went crazy and ate the entire batch himself, while I just shrugged my shoulders and said "Whatever fires your jets."

So. The first thing that cropped into my head was the infamous World Peace Cookies that everyone has raved about. I do like chocolate, salty, grainy shortbread, mostly because it's salty and grainy and tender and sweet. I'd like those cookies just as much without the chocolate. I always thought I'd make those cookies with walnuts, and leave out the chips. I often leave out chocolate chips from a recipe. I think they are overkill in brownies and cookies. I never like "chocolate on chocolate" really. Hmm. So maybe this cookie recipe is out.

But what to make with these pearls? Garnish? Cookies? on top of cupcakes? Or something where they hold their shape? Or should I stir them into a hot cup of latte and turn it into a mocha? I don't dislike chocolate, mind you -- I just don't instantly think of a "go to" recipe that involves, essentially, a Perfectly Round Bittersweet Chocolate Chip.

I could really earn some brownie points and make this a Gift of the Magi type thing, and make Chocolate Chip Cookies for my boyfriend, who loves them, but he's kind of a health nut and would eat one or two, and then give the rest (with my pearls!) to his sisters.

As for suggestions that I simply eat them out of hand, I probably wouldn't do that unless I got very desperate one night for a candy fix, and that wouldn't do them justice, would it?

What shall I make, Devoted Readers?

Thursday, February 5, 2009

Danish Sand Cake


I found this recipe on the side of the box of Swan brand Potato Starch Flour. I was intrigued by the silky texture of potato starch flour, and the fact this was described as a "sand" cake convinced me it would be a cake-version of a sandy, melt in your mouth sable cookie.

On Day One, I thought it was interesting -- more dense than I expected -- and quite mild in flavor. No sooner was the cake baked, I cut a slice, still warm, and simply dusted it with xx sugar, and ate it warm. I wasn't terribly impressed. It was quite acceptable of course. The ratio of butter to dry ingredients assured that. But the texture didn't wow me, and it needed a dollop of cream and perhaps fresh fruit. Otherwise it was a simply a nice, mild, respectable little vanilla tea cake.

On Day Two, it was a whole new ball game. It didn't suddenly grow intense flavor over night, but when it was eaten cool, and not warm, the texture was much more what I expected. Tender, grainy, delicate, and firm -- all at the same time. What a "sand cake" might actually feel like.

My sister and I carved off little bits and snacked on it with coffee, and quite enjoyed it. This cake would be an excellent tea party cake, and would slice well for grilled panini with Nutella, or for Strawberry Shortcake in the summer months. In fact, it would make an excellent shortcake base for berries and cream.

DANISH SAND CAKE

1 cup butter
1 cup sugar
3 eggs
3/4 all purpose flour
3/4 cup Swan Potato Starch Flour
1 teaspoon vanilla
1/2 teaspoon grated lemon peel

Cream butter and sugar, add eggs, one at a time, beating well. Add sifted flour, starch, vanilla and lemon peel. Pour into a buttered loaf pan nd bake in a moderate oven for 45 minutes to one hour.

Thursday, January 22, 2009

Barefoot Bloggers: Easy Sticky Buns


This week on Barefoot Bloggers, we made Ina Garten's Easy Sticky Buns, as chosen by Melissa of Made by Melissa. This recipe was so fun, and so easy, and so tasty, I'm surprised it never occurred to me to try it before. This recipe and method is a natural for any kind of breakfast pastry. I can easily see substituting dried cherries and crushed almonds for Cherry Almond Pastry, or perhaps Maple Butter and Pecans. The varieties you can use are numerous.

As with all Ina Garten recipe, butter figures prominently. I didn't follow any of the recommendations for amounts. Because the *base* for this recipe is puff pastry, which by itself is quite fatty enough, I just used the *idea* of her recipe, and adapted accordingly as I went along, using far less butter.

These rolls were superb! I was particularly happy that the butter melded with the dough to create a more traditional feeling dough, rather than a shattery-flakey roll that disentigrates when you bite it. These held together nicely. It would be very easy to make these rolls, cut, and freeze the cut rounds for baking off on rushed mornings.

Butter and brown sugar is combined to make a loose slurry.

A dollop of the sugar butter is placed in the well of a cupcake tin. I only used six wells, because I only used one square sheet of pastry from Trader Joe's. Pecans are sprinkled over the dollops of sugar butter, and the pan is then set aside.

One sheet of puff pastry is spread thinly with melted butter, onto which cinnamon and sugar are sprinkled. I also added a bit more brown sugar, as well as more pecans.

The pastry is rolled up, jelly roll style, to make a log.


Ina's recipe calls for cutting off the ends and discarding them. How silly and wasteful is that? (said in her own style). Puff pastry melts, spreads and puffs, so trimming uneven ends is completely unnecessary. Cut the log into six equal pieces.


Place one roll on each dollop of sugar butter, in the cupcake pan. Bake for 30 minutes until the roll are well browned and caramelized.
Cool for a few minutes, and turn the rolls out onto a sheet pan lined with parchment. Serve while still warm.


Devour!

About this challenge: The Barefoot Bloggers join forces and cook or bake recipes by Barefoot Contessa Ina Garten each month, chosen in order by members, and present them for discussion on two Thursdays each month. Hungry? Please join us at the table!

Saturday, January 10, 2009

New Jersey Coffee Cake: FAIL.

I love it when people "get me". I love it when people have recipes that "get me." Robin Sue of Big Red Kitchen turned out a beautiful and simple coffee cake which gets me. It has a hugely disproportionate ratio of crumb to cake, which is completely me, and it starts with a yellow cake mix -- also, admittedly, me (thus far). It doesn't have funky raisins, chocolate, icing, or anything other than the cake, the crumb, and a dusting of sugar. That's me.

I recently gifted myself a KitchenAid mixer (I really, really earned it by holding down essentially three jobs in 2008) and the only use I'd made it, in a month, was to turn out a batch of Nestle Tollhouse Chocolate Chip Cookies (hooo humm, boring) for my brother at Christmas.

2009 dawns new, and with that, I'm cleaning out my pantry, inventorying my goods, baking my own goods from scratch, and either putting my appliances to work, or paring them down. This baby isn't going anywhere, so I started with her, this weekend, by making (and failing) Robin Sue's Coffee Cake. All was not lost, however. Read on!


Robin Sue's cake called for one yellow cake mix divided among three cake pans, 4 cups of flour and 4 sticks of butter for topping -- and it makes three full coffee cakes to eat or give away. Egads! I want that high crumb-to-cake ratio, but, I'm not a mother of never-full children or have a husband (I do have a lovely boyfriend who's pretty fit, so he doesn't eat dessert [except chocolate chip cookies--- borrringgggg]. He holds out his hands and turns around slowly and says to me "Do you want to ruin this? Look at me. You probably want me right now." He's vain, but really funny about it, so he gets away with it).

So, I only needed a one-pan cake. Easy, I thought. Just use a cake mix which makes one layer. Right? This was my first mistake.

Trader Joe's makes a simple vanilla cake mix, shown above, which was in my pantry. It makes one 8x8 pan of cake. Perfect for one, right? Cleaning out that pantry is also on the list for 2009, so already, two birds and all that. Now, this cake mix has an unusual personality. When it's raw batter, it's the best tasting vanilla batter I've EVER had. It's rich, buttery, and resplendent with vanilla beans, as you'll see below. But oddly, baked, which I've done once before, it's oddly plain and lackluster. It really needs to be the base of desserts, rather than the star attraction, so I paired it with Robin Sue's recipe with that in mind.


Into the mixer it goes. Wheeeeeeeeeee! Yes! Let's use a $250* mixer to make a $2.99 cake! Freakonimics at work. *I don't remember what I paid for it, but I got a great deal on Amazon. I think it was $150-180 or something. Still. Way to save on baked goods.


See what I mean bout that batter? It's chock full of Vanilla beans. I could eat this batter with a spoon.

But I don't. I spread it as the box calls for, in an 8x8 pan, because it only makes one layer. See where I made my second mistake, Robin Sue? RIGHT HERE! Her recipe calls for dividing one cake mix, among THREE pans -- and makes three cakes. So right there, obviously, the cake is going to be thinner than a traditional layer. I didn't take that into account, and poured the entire bowl of batter into one cake pan. I *should* have poured it into an 8x16 pan, so that I had one long, thin pan of batter. As you'll soon see.


Next, you're supposed to bake the cake for just 15 minutes, to "set" the top, but not cook it. It should look wet and jiggly, right? So here we are, baked for 15-18 minutes, and ready for the crumb topping. I'm a little worried now, because it's baked up high and puffy already, and I see there isn't much clearance in the pan. Oh oh. Now I realize I should have spread it in the larger pan, so it was thin and more bar-like. Crap.

Not dissuaded yet, I had a little tub of Cinnamon Sugar Compound Butter in my fridge for a month now, and it needed to go. I didn't make that cinnamon toast and tea for my mother this holiday season, as I planned, and I can't let it go to waste. The ingredients were pretty much as Robin's called for, except this has brown sugar in it. No matter! I plopped this tub of butter-sugar-cinnamon into the mixing bowl, and happened to drag my finger across it to taste. I was quite surprised by how salty it was, and I looked at the tub again -- sure enough, sea salt was prominent. It was GREAT! A sweet and salty compound butter -- love it.


I planned to then intentionally play up that sweet salty crumb, by adding more of everything. I added the entire tub of compound butter (I guess it was about a stick, more or less), about a half stick more of regular butter, and lots more cinnamon and sea salt, and finally, White Lily soft winter flour. It had the perfect taste to me, and away we go, to top the cake. Kind of looks like ground turkey or lamb, doesn't it?

I then peeked in the oven and said crap again. It was sinking fast. The foamy cake was continuing to rise and would likely go over the plan, while the heavy crumb top was sinking below the waves like Leo on a cruise gone wrong. Darn it all. It's all going to melt like goo inside, I thought. No matter. Just let it bake.
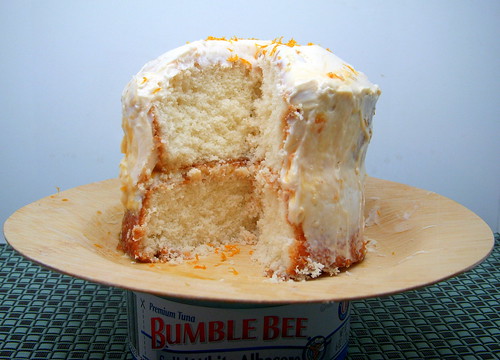
Forty minutes later, baked long enough to make sure it wasn't all battery goo, this is what I had. The dark brown top you see is the cake -- the light bumpy areas are the only remaining evidence of the crumb topping. I knew it was going to be a wreck, but ... it wasn't!
True, it didn't taste or look anything like Robin's, I'm sure, but oddly enough, this is what happened: The crumb mixture only floated about half way down, and rested right in the middle of the cake like a deliberate streusal filling. It didn't melt or turn into goo; it baked into a crumbly streusal texture, and when I sliced a piece and pulled it out, it looked DELIBERATE, like I intended a ribbon of topping to go through the cake. Woo hoo, no one's the wiser! A quick dusting of sugar later, and it was served, with no admission of my silly mistakes.

Monday, October 6, 2008

Blackberry Crostata with a dab of cream


Happy Monday, ya'll. It's cooling down up here in Northern California (we even had the slightest little rain shower this weekend, which was so pleasant), and my desire to hunker in and bake and roast is returning.

The urge to stock up on pumpkins, cake flour, nuts, fruits, spices and everything you need for a Fall Baking Frenzy is strong, but I remain committed to cleaning, organizing and using up the contents of my TWO (yes, 2) freezers: One in my fridge, and one stand-alone chest freezer.

This weekend I found a box of Trader Joe's unbaked pie crusts in my chest freezer, from last season, and the remnants of a bag of frozen raspberries. In my fridge I had a container of fresh blackberries going wonky, and voila -- all three ingredients called for a free form crostata.

The cons -- I didn't like and won't purchase the pie crust again. I know a pre-purchased pie crust isn't ideal and will never beat a scratch pie crust, but I know myself. I will not make and roll out pie dough for just one person. I'll do all sorts of specials things for myself (important for the solo diner, I believe), but scratch pastry has never been one of them. Even Pillsbury makes a better pre-purchased pie crust dough than this, which had no flake to it at all, and was akin to a giant biscuit.

The pros -- the dessert itself was simple, fast, and I think, with some decent dough on hand, I'd make a rustic crostata over a traditional pie every time. I like the rough, free-form nature of it, and the thin end-result delivered an excellent fruit-to-crust ratio (you'd think with as much as I love crust and demand a 50/50 ratio to fruit, I'd make my own, and yet ... )

Of interest, I had a bunch of those little packets of True Lemon and True Lime (pure powdered citrus in a single-serving small packet) which the manufacturer sent to me to sample in relation to a healthy cuisine food project I was working for, and I've been trying to use them up. Typically I use them in my morning fruit smoothies. The pure and intense citrus flavor adds that missing ingredient -- a tart puckery zing -- which always separates a home smoothie from a Jamba Juice smoothie. But I digress.

So I had the packets of True Lemon and decided, what the heck, I'm already mixing flour and sugar to toss with the berries, and it calls for lemon juice as well, so I made a flour mixture of a few teaspoons of sugar, a few teaspoons of flour, and one packet of True Lemon powder. Tossed it all, added the berries, and baked. The fruit mixture was excellent. Tart, sweet, tangy, no artificial flavor at all. I'd do that again, definitely.

In fact, since True Lemon and True Lime are pure (or so they promise me), I'm thinking it would be very simple to have a small container of citrus sugar available for baking and rimming glasses. I'm not advocating not having fresh lemons and limes on hand at all times -- actually I do. I love the zest. But an always-available lime or lemon sugar rim on a cocktail? Laws yes.

Finally, the cream. I really love heavy cream and whipped cream, and I prefer it unsweetened. Just the smooth texture and creamy taste is all one needs -- skip the sugar the next time you whip cream and see if you agree. I didn't even bother to whip the cream, for this crostata. I just drizzled a teaspoon of real cream over the berries and it was perfect that way.

TWO BERRY CROSTATA

1 layer of your favorite pie crust -- purchased or homemade
2 teaspoons of flour
2 teaspoons of sugar (I used vanilla sugar)
1 packet of True Lemon or 1 teaspoon of lemon juice
1 cup of blackberries
1 cup of raspberries
Turbinado Sugar
Orange Juice or Egg Wash

Spread pie crust over a skillet, baking pan, or pie dish (I used a cast iron griddle). Mix flour, sugar and 1 packet of True Lemon in a dish. If using lemon juice, do not add at this point -- reserve. Sprinkle a bit of the flour-sugar-citrus mixture over the center of the uncooked pie crust, and brush it slightly to evenly cover the crust, leaving a wide margin all around. Toss the berries with the remaining flour-sugar-citrus mixture to coat evenly. Pile the berries in the center of the pie crust, smoothing out slightly to leave a several inch margin all around. If using real lemon juice, sprinkle it over the berries at this point. Fold up the crust over the fruit, leaving the center exposed, but pleating the dough to form a barrier. Brush the crust with orange juice or egg wash (I used orange juice), and sprinkle with turbinado or coarse sugar. Bake until well browned and bubbly, at a temp and for a duration suitable for your own oven. Slice, serve with a teaspoon or heavy cream on each slice.

Tuesday, August 12, 2008

PSA: Rite Aid Thifty Style Ice Cream Scoop

I'm calling this a "PSA / Public Service Announcement" for the benefit of the foodie community.

If you've ever had an ice cream cone from a Thrifty Drug Store, now known as Rite-Aid Drugstores, you know they are well-known not just for the inexpensive ice cream cones (when I was a teenager in the 1970s, a single scoop was 10 cents), but for the interesting cylindrical shape of the "scoop" -- which wasn't a scoop at all, but rather a slice of a "tube shape."

I don't know why the shape intriques so many, but I'm right with those customers who have asked many a scooper, over time, where and how they could get a Thrifty Ice Cream Scoop.

All one used to hear in reply was "They are made for and patented by Thrifty" (or Rite-Aid) and there was no further discussion. I'm sure over the years there has been many an employee who adopted one out to a family member, and now, from time to time, they show up for sale on eBay at astronomical prices. I've seen the bids open at $50.00, and it isn't unusual to sell at over $100.00, and the buyers are happy to get them. What price, nostalgia?

This PSA post is for the benefit of all. Hope is on the Horizon. Just by sheer luck I stumbled across the right search terms when I was trying to find another one of the scoops. The Thrifty version is actually a stainless steel trigger-mechanism device, not unlike an "ice cream caulk gun" as seen here.

As I said, these turn up on eBay starting at $50.00 on a fairly regular basis.

What you're looking for, however, is a reasonably priced alternative. This is called the Ice Cream Stacker. They, too, show up on eBay, but they are a reasonable facsimile, accomplish the same task in the same shape as the Rite Aid Ice Cream Scooper (see how I'm using all the right key words in my PSA?) and in keeping with Alton Brown's rule of "no single task gadgets", can be used for many things in the kitchen, from cookie and biscuit cutting to making stacked appetizers and sandwiches. Assemble your canapes or filo pastries, press, cut, and eject your stacked snack. Voila!

You can find an Ice Cream Stacker at a few sources online. I bought mine at Wrapables for $14.95. Fast shipping, I had it in 3 days. You can also find them at Nieman-Marcus, exact same product, for $15.00 each.

Now, I need to make space in my freezer for my ice cream freezer bowl, which is never ready because my freezer is always jammed. Then, I need to browse my Perfect Scoop cookbook.

Or I could just head to Rite Aid and buy a brick of ice cream to play with, which is much more likely.

Monday, June 9, 2008

Granny Boyd's Chocolate Biscuits


I have yet to make the infamous World Peace Cookies, but I plan to do that this summer. From every description I've ever read, I'll declare them to be the best cookie, ever. Until then,

These chocolate biscuits may be the very best cookies I've ever made.

They are Granny Boyd's Biscuits by Nigella Lawson, which I first saw on Amanda's blog.

I'd like to say they were simple, and they probably are, but I made them more difficult by being an American with a dearth of education in the metric system. I really wish I knew it. I have brain power, I should teach myself, somehow. Because the recipe was given in grams, which measures mass and not just volume, conversion can be tricky. I used a cooking calculator which promised to simply and quickly calculate common baking ingredients from grams to cups, but I don't feel it worked very well.

For instance, a cup full of feathers will weigh significantly less than a cup full of sugar, and for these reasons, I think the Euro method of measuring baking ingredients to be probably much more accurate. You can't simply say "how many American cups is the same as 150 grams?" It depends on what it is. Flour? Butter? Sugar? Herbs? Eggs? Different mass for each.

I had confidence in a particular calculator I found because it listed the conversations BY FOOD PRODUCT. Ah hahh! Butter Converter! Flour Converter! Sugar Converter! Perfect.

I thought.

The recipe is simple enough. Only four ingredients. But when the recipe called for me to form a stiff dough and roll it into balls the size of a walnut, I knew I had a problem. My dough was light and fluffy, almost like mousse. There was no way it was a dough, and certainly was not stiff enough to roll in my hand. It fell off the spoon like whipped mousse, so I kept adding flour in 1/4 cup ingredients and still it was light and fluffy but could hold a ball. Because I'd added so much flour, I lost confidence in the cocoa, and added double the amount of that, too. In the end, I did get a product which I was able to scoop up with a finger and roll into a rather moist ball, and flatten with a fork, but it was so light I was nervous. I thought surely they'd flatten out to a bitter, black pancake and burn.

They didn't. In fact, they retained their shape despite being comprised of nearly 50% butter. Oh they spread just a bit, yes, but by no means did they turn into pancakes.

I made a test batch and ate a few and to my surprise, they were simply exquisite. I need to describe them, but it's difficult. Imagine this: A soft, very very very sandy beach, where the grains of sand are chocolate. The water laps in over the sand, but the water is made of salted butter (well it is sea water after all). You scoop up a finger full of this salted, buttered chocolate sand, and bake it in the sun just long enough to dry the butter. That's what these cookies are like. Salty Chocolate Sand, but no grit. Like fairy dust sand.

The edges crumbled and broke on the plate, from my not being gentle enough, and picking them up while still too warm. Once they were fully cool, I could easily lift one to my mouth to eat, and it just held together long enough to be modest and ladylike. When I put it on my tongue and pressed it to the roof of my mouth, it dissolved into soft sandy chocolate and disappeared.

It was quite simply, an awesome taste and an awesome sensation. Nigella Lawson calls them dark and smokey. I thought they were far too delicate and lady like for that kind of masculine description. If they are smokey at all, it's more like the fog rolling in on that beach I told you about, and dancing on your tongue. That's what they were.

And they were damn, damn good.

Because the gooey, soft batter was too difficult to scoop and place, and the few cookies I did make were so rich, I rolled the batter into wax paper and refrigerated it overnight, in a log. The next day, I simply ran a hot knife through the loaf, and cut off small shards, like little chocolate ice bergs, and baked them in that rough shape. They spread somewhat in the pan, but you can tell some of the angles are still there. Floating in that buttery sea, waiting to dissolve on impact. When I got to the end of the roll, it was soft enough to just slice off like butter, and plop onto the pan. Those turned into more delicate looking cookies, easy to use a fork to mark.

Make them. You won't be sorry.

I'm going to give you the original recipe in the original grams, and then put in my notes as to what happened with my recipe. Any assistance from UK bloggers as to what I did wrong (although with happy results) would be most appreciated.

GRANNY BOYD'S BISCUITS by Nigella Lawson

300g Self-Raising Flour
*My converter gave me 2 cups of flour, but my batter was just fluffy, pudding-like mousse, so after using 2 cups of self rising flour, I added 1/4 cup of softassilk cake flour, at least three times, for a total of 2-3/4 cups of flour.

30g Cocoa Powder
*Converter gave me 1.5 tablespoons of cocoa, but because I added so much more flour than called for, I didn't want to dilute the flavor. I added a full three tablespoons of cocoa.

250g Unsalted Butter (room temperature)
*Converter gave me 1.5 cups of butter or three entire sticks. Was this right?!

125g Caster Sugar
*Converter gave me 2/3 cup of sugar. I used Vanilla Bean Infused Sugar and did not increase it as I didn't want it overly sweet.

Method:

Preheat the oven to 170 degrees C. Sift flour and cocoa powder and set it aside.
Cream butter and sugar till light and pale in color. Mix in sifted flour mixture, and continue working until it forms a dough. Roll into walnut-sized balls and arrange on a buttered baking sheet. Flatten dough balls with the back of a fork and bake for 12-15 minutes at 170 degrees C.

*I baked the cookies at 350 degrees for approximately 12-15 minutes and the texture and baking time was perfect.

Any input on my amounts UK bloggers?

Sunday, May 11, 2008

Zucchini Bread


I clicked through from Tastespotting (aka my Porn Site of the Day) and read Au Naturel's recipe for zucchini bread made with chickpea flour, with interest. I had all of the ingredients on hand and was eager to try baking with this unique and healthy flour. I also wanted to try, and have on hand, high fibre coconut flour, so I gave this recipe a go, with a few adaptations.


At first, tasting the mixed batter, I was nervous. It tasted odd, gamey, too chick-pea'ish. But then, as I readied the batter for baking and cleaned up before baking, I tasted the batter again. Within a minute or two, I was tasting it again, scraping the bowl clean for washing. It was growing on me, minute by minute. Very earthy, nutritious tasting. It had personality and a distinct nutty flavor.


The completed bread was delicious. It was simply more interesting than your run of the mill zucchini bread. Mine wasn't nearly as moist as Au Naturel described, but I attribute this to using the coconut flour.

Without knowing I'd be making this quick bread this afternoon, I already purchased lovely, light, tasty Vanilla Bean Quark from a Farmer's Market vendor this morning, and it was the perfect spread. I learned that quark is a European style soft whipped cheese, much lighter than cream cheese, but with a similar taste and texture. It is high protein and much lower in fat. This version was plump full of vanilla bean, and was sampled by the vendor by presenting it on a strawberry. $5.00 later, and it was mine and I was on my way home to making something with it. Turns out, it was this bread!

My lunch for work tomorrow will be tea sandwiches -- high fibre zucchini bread with vanilla bean quark -- and an artichoke from my garden. Spring is here!


ZUCCHINI BREAD with VANILLA BEAN QUARK

3/4 cup whole wheat pastry flour
1/4 cup chick pea (garbanzo) flour
1/4 cup coconut flour
1/2 teaspoon baking powder
1/2 teaspoon baking soda
1/2 teaspoon ground vanilla bean pod
1/4 teaspoon salt
1/4 teaspoon cinnamon
3/4 cup agave nectar
1/4 cup butter
2 eggs
1/2 teaspoon vanilla extract
1 cup shredded zucchini

Sift all dry ingredients (flour through salt) together, twice, to thoroughly blend, and set aside. Beat butter until light and fluffy, and add agave nectar and one egg at a time, beating well after each addition. Add vanilla extract, and beat. Add shredded zucchini, gently mixing in with a spoon. Add the dry flour mixture in thirds, stirring just until combined after each addition. Add batter to a buttered loaf pan, and bake for 40 minutes at 350 degrees.

The most significant change I made was the addition of coconut flour and using a full two eggs in my version. I did this because the package of coconut flour warned that you should only use a ratio of 20% coconut flour to regular flour, that it is very high fibre and absorbent, and will require an equal amount of liquid to help balance out that absorption which will occur during baking. By adding a full second egg, that extra moisture seemed to work just fine, but next time I'll add a bit more liquid. I also sprinkled my loaf not with cinnamon, as in the recipe I read today, but with vanilla flecked sugar, in very light amounts.

Slice when cool, and spread with quark, cream cheese, or fruit butter.

Verdict: Tasty as heck.
Skill: Easy to make, but unusual ingredients means not many will have all these things on hand.
Make again: You bet.

Thursday, May 1, 2008

Make this because it's good for you: Homemade Blueberry Orange Butter

Blueberries and Oranges are two of the world's recognized SuperFoods. I try to eat a lot of SuperFoods, at least several each day (see to the right? I even have a category for it). My sister and I just found a cookbook specifically for SuperFoods and I spotted inside a recipe for making Blueberry Butter (not dairy -- think Apple Butter). I recognized it as a good start -- a culinary canvas waiting my improvements.

First I have to give you some important warnings, before you get started. These are very important, so write these down.

~Use a pan twice as deep as you think you need. This stuff spatters up something terrible.

~If you use a wooden spoon, it will forever be purple. Use a silicone spoon if this bugs you.

~A hand blender will not work to puree the butter.

~Wear an apron. I mean it.

~Have a wet sponge and towel near by.

~Have a container washed and ready to fill when the butter is done. Unlike me.

I'm not even going to reference the cookbook or the author because I adapted it so thoroughly (the oranges and seasonings are mine for instance), they are really different animals. So, this is how we rolled in my kitchen:

Step 1: In a deeper pot than the one you see below, add one 10 oz bag of frozen blueberries (don't use wild, they actually are kinda gritty for this purpose, according to the author); one whole orange which has been peeled and de-seeded (save the peels for zest); 1 cup of unsweetened applesauce; 1 cinnamon stick; 2 shakes of ground clove; 2 big splashes of vanilla extract, and 1/3 cup of brown sugar (I used Splenda brown sugar with perfect results).


Step 2: Stir this mixture thoroughly, constantly, while the fruit boils and combines, as shown below. Cook until the fruit is combined and very soft, approximately 20 minutes.


Step 3: The recipe calls for pouring the entire thing into a blender, and then after thoroughly blended, pouring it back into the WASHED pot (why on earth would you rinse and wash away all the remnants of the fruit in the pot only to add the now blended fruit back into the pan? Lunacy). So, I took a stick blender to it. After a good 10 minutes, I realized this wasn't happening, because either my stick was underpowered for the fruit, or more likely, the pan was too shallow and I couldn't get the thing tilted enough to really mix it under the blades, without spattering everything purple all around me (See Notes: Get a deep pot, wear an apron, and have a wet sponge or towel near by). So, after 10 minutes of what you see below, I actually hauled out the full sized blender and did what I was told and it was much better. But I didn't wash the pot. I poured the fruit back into the unwashed blueberry pot.

Step 4: Continue to cook the now pureed fruit in the pot, on a heat enough high enough to pop and bubble, but not so high it boils up, or spatters too much. I had it on medium low and it simmered away, with me stirring frequently, for about 30-40 minutes. You want to be able to drag a wooden spoon (see warning note about the spoon and notice how my wooden spoon, below, is permanently a bright purple now) across the bottom of the pan and have the fruit not seep back too quickly, as shown below.


Step 5: After the fruit butter is thick and hearty, pour into a container which you have ready (See Warning Note: I didn't have one ready because I'm lame that way). I am glad I actually grew impatient and took the butter off the stove before it was as thick as I wanted -- it thickened considerably when it cooled and I could put a finger or spoon in, and it did not run off the spoon at all. This was what I wanted. Also, once it was cool, I could really taste the subtlety of the cinnamon, the clove, and the orange. Avoid overseasoning while it's cooking -- because I didn't think I'd added enough while I was tasting it during the cooking process.


Verdict: This is not like any blueberry flavored product I've had before. I'm not a huge fan of blueberries because blueberry muffins are kinda boring and I'd never eat a slice of blueberry pie. Too fake tasting. I want to get blueberries into my daily menu however, and I eat a lot of Fat Free Greek Yogurt, so I thought this was a good way to get blueberries in without too much straight blueberry flavor -- and this fit the bill. It tasted of deep rich purple - more berry than blueberry, sweet orange, clove and cinnamon and vanilla. It was not overly sweet (I didn't add nearly as much sugar as called for) and was fabulous with a big spoon of yogurt to test it out. I'm very happy with it.


If you're on a diet, dollop this Blueberry Orange Butter on:


Greek Yogurt; Oatmeal; Cereal; Toast; Granola; Cottage Cheese


If you're not on a diet, dollop this on:


Pound cake; ice cream; rice pudding; tapioca pudding; any pudding; under desserts; over desserts; or with a spoon and a can of aerosol whipped cream.

Also, because of my crappy camera skills, that photo looks like brownie batter. It's actually VERY purple, as shown on my cottage cheese bento lunch, here:


Bento Lunch 05-02-08

Tuesday, April 22, 2008

Lame Series: Sugar Free Apricot Orange Cake

Orange Apricot White Cake

Sometimes you just want a bite or two of something sweet, and not an enormous or full-sized dessert. Enter "Small Batch Baking" which is really a nifty little cookbook devoted to recipes which make very small quantities of your standard desserts. A recipe which makes 2 oatmeal cookies, or 4 cupcakes, or, this small white layer cake (made sugar free by me), cooked in empty tuna fish cans (I warshed 'em and took the labels off, but left one full can in to show scale). Overall, I've been very pleased with the book, but this entry doesn't do the book justice. It just demonstrates how lame and pitiful I can be.

This dessert classifies as lame because a) I didn't make the frosting. I tried the relatively new Pillsbury Reduced Sugar Icing and it was kinda fake tasting (gee, how shocking); b) I baked it in a toaster oven so it got a little dry; c) I spread no-sugar orange apricot fruit spread inside and made a royal mess; d) I didn't bother covering all the sides but I did manage a quick grating of orange zest to up the gourmet factor. Lame.

Resources: Small Batch Baking Cookbook
Flickr Group: Lots of photos of small batch items that are NOT lame.

Sunday, April 13, 2008

Almond Joy Bundt Cake


I recently tried Nutella for the first time and I'm a convert. To quote the eloquent Kitty at My Husband Hates Veggies, Nutella really is the bomb diggity. It was on sale at Long's Drugs 2-for-1 so now, of course, I need to make Nutella desserts. This is a cake to take to the office tomorrow, a fast and easy concoction inspired by pantry staples and my jar of Nutella.

I mixed a white cake mix according to package directions, but added a healthy dose of almond extract to taste. I removed one cup of almond cake batter to a small bowl, and mixed in 1/3 cup of Nutella, and 1/4 cup of coconut. I set this aside, and into a bundt pan, I poured 1/2 of the remaining almond cake batter, and then spread dollops of the Nutella Coconut cake batter on top, running a knife through to marble somewhat. I topped this with the remainder of the almond cake batter, and baked according to package directions. When it was baked, I drizzled it with more Nutella and a sprinkle of coconut shavings. You could mix almonds into the Nutella layer, or even in the base of the pan so as to make into the crust, but I kept it simple with almond extract.


Update 04-14-08:
Well, it is a success. They like it! Hey Mikey! (Then again, what WON'T coworkers eat?)

Saturday, April 12, 2008

Mini Brioche French Toast

So Damn Good

Mini Brioche French Toast

Looks like a huge plate of it, doesn't it? Nope! Made with a leftover brioche dinner roll.

1 small brioche dinner roll
1 egg
1 teaspoon fat free half and half
1 dash of nutmeg
2 pats of butter spread
2 tablespoons sugar free maple syrup
1 teaspoon powdered sugar

Beat the egg, half and half, nutmeg and any other spices you like, slice the brioche dinner roll and dip into egg custard, and sautee in a pat of butter spread until golden brown. Top with another pat of butter spread and SF maple syrup.

My friend Dottie in PA has always recommended the sugar free maple syrup from the East Coast based Waffle House chain. I found a bottle online and purchased it, and boy, was she right. That stuff is just plain AWESOME. No fake flavor whatever, and no nasty after-effects of the sugar alcohols.

As soon as my bottle is gone, Dottie, I'm afraid I'll need to send you on an errand. :)