Showing posts with label Breakfast. Show all posts

Tuesday, September 8, 2009

The Great Biscuit Fraud

My Cream Biscuits, still hot from the oven
This post is MUCH too long to be just about biscuits, but, what can I say? I'm a carb queen.

I wish I didn't love McDonald's Buttermilk Biscuits. I shouldn't love them. No one should. Come on, it's a fast food chain -- they shouldn't sell good biscuits, but they do. I like that they are light and tender, and hold up well to a sausage sandwich. I've heard tales from some forums that McDonald's uses a mix and adds water, rolling them out and baking (which seems unlikely); while others claim they come in a pre cooked slab and are heated from frozen with a brush of margarine (which seems more likely). I once knew a woman who -- ahem -- never had to pay for her lunches because she was particularly nice to the married cafe manager. Really nice. I'd like to think I'd never barter myself for a tuna sandwich, but then again, if I confirmed McDonald's uses a water based mix I might shame myself with my efforts to meet a manager and get a big bucket of it, somehow.

Buttermilk Biscuits shouldn't be difficult to make, but I've yet to find the perfect recipe (e.g., one that I can't screw up with too heavy a hand). Don't even suggest Pillsbury Grands -- those are an abomination, and although I'm a Trader Joe's Junkie, I don't like their frozen biscuit dough, either. Heavy, dense and greasy.

I'd like to be able to make my own and keep them frozen so that I can grab one for a portable breakfast sandwich, so I've gone on a quest to find that recipe. This will not only address my portable breakfast agenda, but, will help bring to an end a long running fraud I've been committing for years. YEARS, I tell you.

At least 7-8 years ago, I was invited to a potluck picnic by my boss and his wife. They were serving chicken and ribs and such, and I was asked to bring bread. Ah Ha! I thought. I've got some frozen Schwan's Southern Style Biscuits , those will work just fine. I baked them off, took them to the BBQ, and my boss went nuts, telling me, and his wife, that they were the best biscuits he'd ever had.

This Biscuit Adulation didn't sit well with his wife, who is a great cook and didn't like that someone else was getting all the attention, so she asked me for the recipe over and over again. I never said "Oh they are just frozen Schwan's biscuits, order some." NO, I had to complicate my life and lie, so I said "Oh I don't share that recipe -- it's my family recipe, but I"ll bring you some anytime you want, and you can keep them in your freezer and just bake them off for him whenever he asks for them."

Thus began the Great Biscuit Fraud. I ended up having to buy -- several times -- bags of frozen Schwan's Biscuits and giving them to her in a baggie with written instructions (they come in frozen par baked dough). I've done it probably once or twice a year, for 7 years. She's even said we should have one of those biscuit and tamale making parties around the holidays and put them all up at once. I always decline (of course). Oh what a tangled web we weave, and all that. Fortunately she doesn't read this blog.

I agree they are pretty damn good, but more free form -- a little closer to a drop biscuit -- than the rolled biscuit in the Schwan's product photo, but it's a pain in the ass to order ahead and coordinate delivery every other week, and tell the driver yet again that no, I don't want any of their overpriced frozen steaks. Just the biscuits. Oh, and some of the English fish and chips, those are excellent. And um, those vanilla ice cream sandwiches, too (See? this is why I can't shop at Schwan's anymore, except when I need to lie to my boss about biscuits).

Anyway, I want -- and need -- to master my own biscuit recipe so I've set about finding one that is fluffy, light, golden, and buttery. I've tried Angel Biscuits in the past, which are yeast based, but they didn't quite make it, either. Too much like a roll.

I found a recipe booklet online (and what a hoot it is), which has recipe clones for everything McDonald's sells, and it had the biscuit recipe in it. It seemed simple enough -- basically a doctored Bisquick biscuit recipe, but I was wary of anything which started with Bisquick. I was right to be wary. They were NOT the biscuits they sell in the restaurant, so don't be fooled. I'm not even posting the pic of those I made because they are not worthy. A decent enough biscuit, surely, but nothing to write home about. Oh, sorry, was I droning on? Have you tired of my biscuit drama and you want a link to the McMenu Cookbook instead? See the bottom of this post, if you're still with me.

Anyway, back to the biscuits. The McDonald's clones -- out. Not worthy. The Angel Biscuits -- meh. Not quite worthy. Then I found a "Cream Biscuit" recipe on the King Arthur Flour website and tried those. I recently learned that I really liked cornstarch based bakery recipes due to the wonderful texture. The best cake I've ever made was mostly cornstarch, so this recipe, which calls for more than the average amount of cornstarch, and heavy cream (whoo yeah) which I had on hand, seemed promising.

Also, I read a cookbook by Jane and Michael Stern -- Recipes from The Blue Willow Inn -- and the tip from the cook at this Southern inn said to handle the biscuit dough as little as possible. Literally stir just a bit until the flour is moist, slap the stringy floury wad down on the board and pat it out without kneading, and cut them without really mixing the dough all that well. I used KAF's recipe, but followed the Blue Willow Rule, and I'm really glad I did.

These biscuits were VERY VERY good. Best biscuits I've made to date, that's certain. The texture was wonderful. Very tender, very buttery, very delicate. Loved the crispy almost granular crust and the soft interior. However, they were not high and pillowy -- they didn't rise terribly high, and, when sliced for a sandwich, tended to crumble. So while these are great for a breakfast basket, they are not quite the right biscuit for a portable sausage breakfast sandwich.

KAF calls these Guaranteed Biscuits. I guarantee I'll make them again and eat the batch within 24 hours because they came together really quickly (except for the freezing time in Step 5 but that gave me time to clean up), but the quest for the McDonald's biscuit close, or a proper Buttermilk Biscuit, continues. Got any winning recipes for me?


KAF GUARANTEED BISCUITS (CREAM BISCUITS)

1 3/4 cups KAF AP Flour
1/4 cup cornstarch
3/4 teaspoon salt
1 tablespoon baking powder
2 teaspoons sugar
1 to 1 1/4 cups heavy cream, enough to make a cohesive dough
1 to 2 tablespoons melted butter

Directions
1) Whisk together the flour, cornstarch, salt, baking powder, and sugar. Stir in enough heavy cream to moisten the dough thoroughly. You'll probably use about 1 cup in the summer, 1 1/4 cups in the winter, and 1 cup + 2 tablespoons at the turn of the seasons. You want to be able to gather the dough together, squeeze it, and have it hang together easily, without dry bits falling off.
2) Turn the dough out onto a lightly floured work surface, and very gently pat it into an 8" circle about 3/4" thick. If you're uncertain about your ability to make a nice free form 8" round, pat the dough into a lightly floured 8" round cake pan, then turn it out onto a lightly floured surface.
3) Use a sharp 2 ¼" biscuit cutter to cut rounds. Place them on a lightly greased (or parchment-lined) baking sheet.
4) Brush the biscuits with butter, if desired, for extra flavor.
5) Place the pan in the freezer for 30 minutes. This will improve the biscuits' texture and rise.
6) Preheat the oven to 425°F while the biscuits are in the freezer.
7) Bake the biscuits for 20 minutes, till they're golden brown. Remove from the oven. If you have any melted butter left over, brush it on the baked biscuits. Serve immediately.

Sunday, May 10, 2009

Banana Blueberry Breakfast Bread


Banana Blueberry Breakfast Bread. That's a lot of B's. This bread was totally worth the experiment it involved.

I started with my standard breakfast bun recipe which I created with the Stealth Cinnamon Rolls from earlier this week. Since I halved that recipe, I was left with a half a box of yellow cake mix, and I wanted to see if my theory, that this recipe would make a great yeast bread, was a good one. It was. In fact, it made a better loaf bread than it did rolls.

When I made the cinnamon rolls, I didn't trust how "wet" the dough was and I added as much as an additional cup of flour to the "half" recipe, and the rolls, while still high and tasty, were somewhat dry and more bread than pastry-like. This time, I resisted the urge to add more flour and just let the wet dough raise on its own without my interference, and I'm glad I did. It turned out just fine, and was moister than the rolls.


BASIC BREAKFAST BREAD

This recipe is for ONE LOAF -- a half recipe.

1/2 box of yellow cake mix (no pudding in the mix)
1-1/4 cup of warm water
1 package of yeast
3 cups of flour
1/2 teaspoon of salt

Mix all ingredients thoroughly. Allow to double in volume. Punch down, and stir in any mix-ins, or, roll out on a chopping board, layer toppings, and roll up. Add to a buttered loaf pan, allow to double in volume again, and bake for 20 minutes at 375 degrees.

For this variation of the basic bread, I used my bread machine to mix the dough, only. At the "fruit and nut beep" I added 2 big handfuls of Trader Joe's Freeze Dried Blueberries, and 1 big handful of Trader Joe's Freeze Dried Banana Slices, and 1 big handful of chopped walnuts. I crushed more dried blueberries for the top of the loaf (which was really pretty, like painting with water colors). I then took it out of the machine and kneaded and raised it myself, in a loaf pan, before baking.

This particular loaf would have tasted great with a lemon cake mix, but I was using up the 1/2 box left from the cinnamon rolls. I let the loaf raise, baked it off, and sliced. It was just perfect. This bread is not "too too" sweet, it's closer to Hawaiian Sweet Bread. It made EXCELLENT toast -- really superb toast, in fact. 

As pictured, though, I've spread some Lemon Quark on a slice, which was also top notch. Quark is a much lower fat and creamier, lighter version of ricotta or mascarpone.  Many compare quark to cream cheese but quark is much "fluffier."  I get mine from a Farmer's Market in both Vanilla and Lemon flavors. Lemon Quark on Blueberry Banana Bread Toast was really fantastic.  

I buy mine from Spring Hill Cheese Company based in Petaluma, California, which sells it at Farmer's Markets, but it looks like you can get it mail order -- which has to be a little costly because it's perishable -- but if you have to go through life without trying their Vanilla Bean or Lemon Quark, it just may be a sacrifice you have to make.

Thursday, May 7, 2009

Stealth Cinnamon Rolls


I'm calling these Stealth Cinnamon Rolls because I'll bet you don't realize you've got every single ingredient for these, in your pantry, most of the time. I saw the recipe and thought "You know, I could make those right now!" and I did. The concept is interesting, and I immediately thought of several variations on the theme, as shown below.


CAKE MIX CINNAMON ROLLS

  • 1 box of yellow cake mix (no pudding in the mix)
  • 2.5 cups of warm water
  • 2 packages of yeast
  • 1 teaspoon of salt
  • 5 cups AP flour

Mix all ingredients thoroughly. Allow to rest and raise, doubling in size, for approximately 1 hour. Roll out, spread thickly with butter, and sprinkle thickly with cinnamon and sugar. Roll up on the long edge, cut into 1 inch spiral rolls, and set in pan, or in muffin pans. Allow to raise a second time, approximately 1 hour. Bake at 350 degrees for 20 minutes. Ice with glaze of your choice.


I halved this recipe, and found the dough so sticky, I kept adding more flour to get it to come together in a soft ball. As much as a cup more flour than I thought. I think may have lead to the rolls being more bread and less pastry like, but they were still soft and tasty. Next time, I'll trust the sticky dough and leave it alone. Still it was so simple. I added ground vanilla powder to the cinnamon sugar mixture, but not nearly enough butter -- they were cooked perfectly throughout, but I like a bit more moisture in the rolls, so next time I'd use more butter and maybe bake them 5 minutes less. Otherwise, they rose high and light. HALF of this recipe made a full 13x9 pan, so if you used the recipe as written, you'd get a bunch of rolls for sure.


VARIATIONS I'VE CONSIDERED:


Red Velvet Cake Mix + Cream Cheese Filling


Chocolate Cake Mix + Coconut Pecan Nutella Filling


Lemon Cake Mix + Citrus or Coconut Filling, or Blueberry or Poppyseed


Spice Cake Mix + Nut Filling


Carrot Cake Mix + Cream Cheese Filling


White Cake Mix + Almond Extract + Chopped Cherry Filling


Ooh, the possibilities of fast breakfast rolls!


Tuesday, February 17, 2009

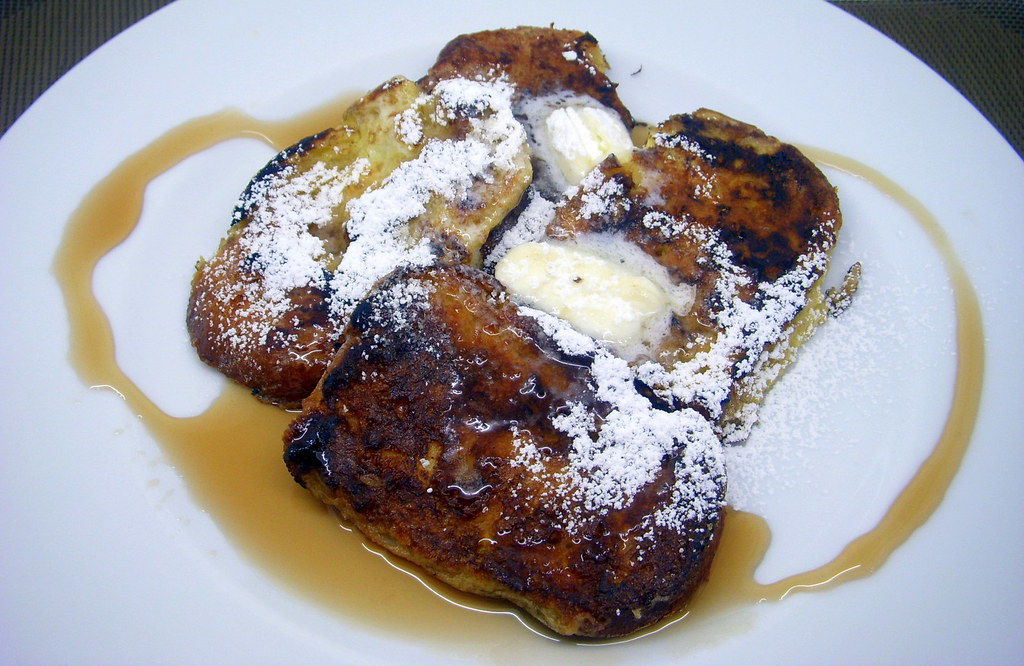
French Toast Pancakes


I had a cello pack of three frozen pancakes to use up from my freezer. I am *really* pleased with myself for clearing out space and ridding myself of pre-made or purchased bakery products as part of my BYOB (Bake Your Own Bread and Bakery Products) participation for 2009.

I also had an egg.

Hmmm. So I could make a pancake plate with a scrambled egg, or, I could just use the pancakes, dip them in the beaten egg, and prepare them as french toast.

Q: Would it taste like pancakes, french toast, or both?

A: Both! The pancake itself wasn't terribly great (generic brand) but with a homemade leftover pancake, frozen so that it doesn't sop up too much egg and holds firm, it would be quite a nice twist.

Wednesday, January 28, 2009

Best Breakfast Burritos EVER

I love this breakfast burrito so much, I've had it for dinner three times in the past week. It's so delicious, so simple, and so fast, it's my current love. I was inspired by the version made by Muneeba at An Edible Symphony, because as soon as I saw it, I knew it was the answer to what I disliked most about most breakfast burritos: The over-cooked scrambled egg and often greasy breakfast meats. I love the concept of a breakfast burrito, but I often dislike the end result for those two reasons.

As soon as I saw Muneeba's version, I smacked myself in the head and said "Of Course, use a softly fried egg, don't use a scrambled egg, silly, and that problem is solved! Who told you they have to include scrambled eggs?"

I had all the ingredients I needed on hand, and set to work.

Above: For my version, I started with a fresh tortilla, from dough. My local Costco sells the uncooked tortilla in paper thin sheets. The only require a quick heating (perhaps 1 minute or less per side) in a dry skillet to cook. Naturally, you can use a plain, cooked tortilla, but do heat it first, in a dry skillet, so that it warms the ingredients as you build. Here, I just place the uncooked tortilla in a pan, no butter or fats required, and turn it on high. Note it is slightly translucent.


Above: In about 30 seconds, the tortilla begins to puff, and turn white as the dough cooks.


Above: When the first side is browned and bubbly, turn it over with tongs and cook the other side very briefly, perhaps 15-20 seconds. The second side should be less brown -- we're going to be working on that side again in a little bit, below. Keep your pan warm, but not hot -- you'll need it again in a minute.

Above: Lay the tortilla on a paper plate or towel, and on the darker, more grilled side of the tortilla, quickly spread a thin layer of cilantro dip and sprinkle with shredded cheeses. Mine is my favorite -- Trader Joe's Roasted Pecan Cilantro Dip (basically a cream cheese and cilantro spread). Muneeba's version used Cilantro Chutney. I have that as well, but this dip is my preferred taste -- it's milder.

Above: Add another layer of your preferred toppings. Here, I used just a scattering of black beans, and a scattering of diced green onion. You could certainly add Spanish rice here, or avocado slices, or even shredded pork or carnitas. Here, I'm just keeping it simple to show you my base burrito. Set this stage of your burrito aside, and return to your warm pan.

Above: Lightly butter the skillet and softly fry an egg. You want the whites cooked gently, and still a somewhat loose yolk (but no runny whites, yuck).

Above: Just before it's ready to come out of the pan, I quickly break the yolk with just a swirl or two. I don't want it hard or cooked through -- I just want the yolk to be more evenly distributed with the egg white. Keep the pan warm, but not hot. Do not wipe it out.

Above: Quickly slide the egg from the pan onto your waiting tortilla. All photos from this point forward will be blurry because I dropped it right in my egg yolk! I tried to get the yolk off the lens. I think I need a q tip and alcohol.

Above: Fold up the sides and roll up like a burrito.

Above: Place the rolled burrito back in the warm pan, and using the trace amount of fat still left, begin to brown/crisp the outside of the burrito. Remember I told you that I spread the dip and toppings on the browner of the two sides? That's because when it goes into the pan again to warm up, the less brown side will catch up. This also helps melt the cheese a bit inside, and finishes cooking the soft egg.

Above: Slice in half, take a bite, and enjoy the best, most flavorful, unique, and definitely NOT greasy and heavy, Breakfast Burrito.

Sunday, January 11, 2009

Breakfast for Dinner: Baked Eggs


No recipe for this, just a method basically. Line a cupcake tin with your choice of thin meat -- lunch meat ham, or perhaps proscuitto. I used shaved ham, and it was rather delicate, with many gaps, so I used quite a few shaved slices to plug gaps, and I lightly buttered the cupcake tin in order to make sure the egg released, if it leaked through the ham. One the ham was layered, I grated a bit of Gruyere over the ham, and sprinkled about 1/2 teaspoon of cream. I cracked one egg into each cup, and added another 1/2 teaspoon of cream, and a bit more Gruyere. I topped each egg with crumbled bacon bits and seasonings, and baked at 350 for about 15 minutes.

I guess that *is* a recipe, isn't it?
Posted by Picasa

Saturday, January 10, 2009

New Jersey Coffee Cake: FAIL.

I love it when people "get me". I love it when people have recipes that "get me." Robin Sue of Big Red Kitchen turned out a beautiful and simple coffee cake which gets me. It has a hugely disproportionate ratio of crumb to cake, which is completely me, and it starts with a yellow cake mix -- also, admittedly, me (thus far). It doesn't have funky raisins, chocolate, icing, or anything other than the cake, the crumb, and a dusting of sugar. That's me.

I recently gifted myself a KitchenAid mixer (I really, really earned it by holding down essentially three jobs in 2008) and the only use I'd made it, in a month, was to turn out a batch of Nestle Tollhouse Chocolate Chip Cookies (hooo humm, boring) for my brother at Christmas.

2009 dawns new, and with that, I'm cleaning out my pantry, inventorying my goods, baking my own goods from scratch, and either putting my appliances to work, or paring them down. This baby isn't going anywhere, so I started with her, this weekend, by making (and failing) Robin Sue's Coffee Cake. All was not lost, however. Read on!


Robin Sue's cake called for one yellow cake mix divided among three cake pans, 4 cups of flour and 4 sticks of butter for topping -- and it makes three full coffee cakes to eat or give away. Egads! I want that high crumb-to-cake ratio, but, I'm not a mother of never-full children or have a husband (I do have a lovely boyfriend who's pretty fit, so he doesn't eat dessert [except chocolate chip cookies--- borrringgggg]. He holds out his hands and turns around slowly and says to me "Do you want to ruin this? Look at me. You probably want me right now." He's vain, but really funny about it, so he gets away with it).

So, I only needed a one-pan cake. Easy, I thought. Just use a cake mix which makes one layer. Right? This was my first mistake.

Trader Joe's makes a simple vanilla cake mix, shown above, which was in my pantry. It makes one 8x8 pan of cake. Perfect for one, right? Cleaning out that pantry is also on the list for 2009, so already, two birds and all that. Now, this cake mix has an unusual personality. When it's raw batter, it's the best tasting vanilla batter I've EVER had. It's rich, buttery, and resplendent with vanilla beans, as you'll see below. But oddly, baked, which I've done once before, it's oddly plain and lackluster. It really needs to be the base of desserts, rather than the star attraction, so I paired it with Robin Sue's recipe with that in mind.


Into the mixer it goes. Wheeeeeeeeeee! Yes! Let's use a $250* mixer to make a $2.99 cake! Freakonimics at work. *I don't remember what I paid for it, but I got a great deal on Amazon. I think it was $150-180 or something. Still. Way to save on baked goods.


See what I mean bout that batter? It's chock full of Vanilla beans. I could eat this batter with a spoon.

But I don't. I spread it as the box calls for, in an 8x8 pan, because it only makes one layer. See where I made my second mistake, Robin Sue? RIGHT HERE! Her recipe calls for dividing one cake mix, among THREE pans -- and makes three cakes. So right there, obviously, the cake is going to be thinner than a traditional layer. I didn't take that into account, and poured the entire bowl of batter into one cake pan. I *should* have poured it into an 8x16 pan, so that I had one long, thin pan of batter. As you'll soon see.


Next, you're supposed to bake the cake for just 15 minutes, to "set" the top, but not cook it. It should look wet and jiggly, right? So here we are, baked for 15-18 minutes, and ready for the crumb topping. I'm a little worried now, because it's baked up high and puffy already, and I see there isn't much clearance in the pan. Oh oh. Now I realize I should have spread it in the larger pan, so it was thin and more bar-like. Crap.

Not dissuaded yet, I had a little tub of Cinnamon Sugar Compound Butter in my fridge for a month now, and it needed to go. I didn't make that cinnamon toast and tea for my mother this holiday season, as I planned, and I can't let it go to waste. The ingredients were pretty much as Robin's called for, except this has brown sugar in it. No matter! I plopped this tub of butter-sugar-cinnamon into the mixing bowl, and happened to drag my finger across it to taste. I was quite surprised by how salty it was, and I looked at the tub again -- sure enough, sea salt was prominent. It was GREAT! A sweet and salty compound butter -- love it.


I planned to then intentionally play up that sweet salty crumb, by adding more of everything. I added the entire tub of compound butter (I guess it was about a stick, more or less), about a half stick more of regular butter, and lots more cinnamon and sea salt, and finally, White Lily soft winter flour. It had the perfect taste to me, and away we go, to top the cake. Kind of looks like ground turkey or lamb, doesn't it?

I then peeked in the oven and said crap again. It was sinking fast. The foamy cake was continuing to rise and would likely go over the plan, while the heavy crumb top was sinking below the waves like Leo on a cruise gone wrong. Darn it all. It's all going to melt like goo inside, I thought. No matter. Just let it bake.
Forty minutes later, baked long enough to make sure it wasn't all battery goo, this is what I had. The dark brown top you see is the cake -- the light bumpy areas are the only remaining evidence of the crumb topping. I knew it was going to be a wreck, but ... it wasn't!
True, it didn't taste or look anything like Robin's, I'm sure, but oddly enough, this is what happened: The crumb mixture only floated about half way down, and rested right in the middle of the cake like a deliberate streusal filling. It didn't melt or turn into goo; it baked into a crumbly streusal texture, and when I sliced a piece and pulled it out, it looked DELIBERATE, like I intended a ribbon of topping to go through the cake. Woo hoo, no one's the wiser! A quick dusting of sugar later, and it was served, with no admission of my silly mistakes.

Thursday, January 8, 2009

Barefoot Bloggers: Sour Cream Banana Pancakes


I am a pancake purist. I don't want fruity toppings. I don't want them to have chocolate chips, heaven forbid, or swirls of whipped cream. When "Horton Hears a Who" came on film, there were non-stop commercials by IHOP for their multi-hued unnaturally colored stacks of IHOP WhoCakes. I found the commercials impossible to watch, so repellent was the site of a stack of cakes oozing blue goo.

I also dislike making pancakes, because I just SUCK at this task. I want them even toned, brown, and cooked throughout. I can't do this. When Robin Sue of Big Red Kitchen shared her tip of Pancake Bars, I was all over that. True, Pancake Bars lack the brown tone on each side, but the perfect symmetry of each bar makes them far and away better than my lame pancake results. Those, and Dutch Babies, are the way to go in my house.

Still, I was game to try Ina Garten's Sour Cream Banana Pancakes as this month's Barefoot Bloggers challenge. This selection was by Something Sweet by Karen. Very few of Ina's recipes thus far have disappointed me, and perhaps it was time to break out of my pancake rut. I knew I wouldn't do a good job and I was sorely tempted to bake them into bars (and next time, I definitely will), but for this outing I was true to the recipe in every respect (save splitting it half so I only got six small pancakes to play with).

I was pleasantly surprised how much I liked the slightly sweet and sour tang of the pancake itself, with a bite of lemon zest. I'd certainly make the pancake itself, without the banana, as a light and refreshing alternative to buttermilk pancakes. I found the banana bits melted into hot fruit and were very pleasant.

So. On with the show of how much I suck at making pancakes.

Fine Dice on the Bananas.

Sifting the dry ingredients. I added a touch of ground vanilla bean and nutmeg.

I also suck at photography, if that wasn't apparent. Combining sour cream, milk, egg, vanilla and lemon zest.

This is where it gets dicey. I have a great, heavy, flat cast-iron skillet. I added the amount of butter called for, ladled on the batter, and topped with diced banana, and waited for failure.

I didn't have to wait long. See this? I hate this kind of pancake. This is not edible in my book, even if its cooked. Bah. Hmph. Dang it all.

This is a LITTLE better, but not much. I'm going to take all the butter out and fry it dry and see what happens.


Now THAT's what I'm talking about. This, without butter in the pan, turned out even and brown. THIS I can live with, and eat. Now I'm happy. :)


I topped with additional sliced bananas as directed, and drizzled with Maple Butter. I used Maple Butter in place of maple syrup (there is no actual butter or dairy in this product -- it's 100% Maple, just spun much like spun honey, which becomes white and solid). I heart Maple Butter.


About this challenge: The Barefoot Bloggers join forces and cook or bake recipes by Barefoot Contessa Ina Garten each month, chosen in order by members, and present them for discussion on two Thursdays each month. Hungry? Please join us at the table!

Saturday, August 9, 2008

No Flap, Jack ...


... these are pancakes.

I loved the pancake square technique suggested by Robin Sue at Big Red Kitchen so much, I wanted to leave my office and go home to make them. Immediately. I restrained myself until the weekend, but knew I'd be making these come Saturday morning, and make them I did.

I may never flap my jacks again.

This is SUCH an easy method, I wonder why it's never occured to me before, or why I've never seen it before? You simply butter a baking pan, add your pancake batter, and bake until set. Cut in squares, and serve.

As Robin Sue points out, it's easy to customize these pancakes by any number of additions (fruit, nuts, chocolate chips, etc), but I'm a purist. I like butter and maple syrup, and that's about it -- another reason recipe Robin's appealed to me. It was plain and simple.

I followed her recipe almost exactly, but for using vanilla bean sugar instead of plain, and, I wanted a thinner pancake with more crust to cake ratio, so instead of using an 8x8 pan, I used an 8x12 pan for a thinner, more crusty area bar. They cooked in 20 minutes and popped out easily.

In prepping my pancake squares to eat (I buttered the top of the entire pan), I recalled I had a jar of maple butter waiting to be used, and that was a mighty fine substitution for more butter and syrup. The maple butter is really just a big jar of maple icing, truth be told, and I ended up with Maple Bars which were scrumptious.

A huge plus: Because this is really a method more than a recipe -- really you could use your favorite pancake mix and a toaster oven and have hot breakfast before your hair is dry. Just shake up some pancake batter of your choice and pour it into your buttered pan, and if you place it into a toaster oven which shuts off with the timer, you'll bake them without burning (and get some crusty tops), and they'll be ready by the time your morning shower and toilette is finished. No standing over the stove with a spatula, rebuttering the pan, making people wait their turn for a hot pancake or lamenting over the rejects. These will also freeze like a breeze and I can pop one into a bento box for breakfast at work during the week.

Thanks, Robin!

Robin's Pancake Squares

3/4 cup milk
2 T. melted butter
1 large egg
1 T. sugar
1 cup flour
2 t. baking powder
1/4 t. salt

Preheat oven to 350°. Lightly grease an 8x8 baking dish (for thicker bars) or 8x12 baking dish (for thinner squares). In a large mixing bowl, beat together milk, butter and egg. Add sugar, then gradually beat the flour in. Carefully stir in the baking powder and salt. Pour batter into prepared pan. Bake for 20-25 minutes. Serves 4-6.

Thursday, July 31, 2008

Chili Relleno Bake


This comforting and light casserole was inspired by two things and made rather late in the evening, when my energy level was uncharacteristically high.

First, I'm clearing out my over stocked freezer, pantry and refrigerator with things gone past their prime, discovering things I'd forgotten I purchased, discovering MANY duplicates purchased because I'd forgotten I already had it, all in preparation for making a "Pantry Inventory" to post on this blog.

I seriously overshop. I think part of it is entertainment and part of it is stress reducing, but I could blog about that for pages and bore you to tears. Fellow groceryovershoppers will already know. What I plan to do is post my inventory and begin crossing off some of the items as I use them, and invite suggestions from my fellow bloggers -- e.g., Hey, Kate, did you know you have every ingredient on your list to make my Grandma Ruby's Beanie Burger Surprise?

Second, I had a package of Sargento Ultra Thin Cheese to use and I do mean ultra thin. That stuff is like "Cheese Paper" -- which appeals to my delicate sensibilities. You can see your hand through it. I wanted the calorie content of this gossamer cheese slices, so I visited the Sargento website and landed on a recipe for Chile Rellano Bake. As I scanned the recipe, it occurred to me I had every single ingredient and best of all, many of them were on my "use it up quickly" list.

In a word: Delicious.

It's a cross between a lasagne-tamale pie and a chile rellano quiche. The torn tortillas mixed throughout make a masa flavored layer which helped puff up and support the eggy quiche. The ultra thin cheese I told you about? I used three slices to lay across the top before it baked. You can see how thin it is because all the ingredients show through.

This could be breakfast, lunch or dinner -- it's so versatile. I'm hoping it freezes well, as I'll have only a slice or two myself, and then cut it into portions to freeze for portable breakfast on weekday mornings.

On with the recipe!

Chili Relleno Bake


Ingredients
1-1/2 cups (6 oz.) shredded reduced fat Mexican flavored cheese, divided
(I used 1 cup of reduced fat mozzerella, 1/4 cup of low fat diced cheddar, and 3 ultra thin slices of cheddar)
1 can (12 oz.) evaporated skim milk
3/4 cup (6 oz.) Egg Beaters®
6 (6-inch) corn tortillas, torn into 2-inch pieces
(I had three kinds of small, 4-5 inch soft handmade corn tortillas almost past their prime. I used two each of plain, green chili, and mild red chili flavored tortillas)
2 cans (4 oz. each) chopped green chilies
(I used 2 whole, canned, green chilis, chopped and it was plenty)
1/2 cup mild chunky-style salsa
1/4 tsp. salt (optional)
2 Tbsp. chopped fresh cilantro
Fat-free or light sour cream (optional)

Directions
Coat 10-inch deep dish pie plate or 8x8-inch baking dish with nonstick cooking spray. Combine 1 cup cheese, milk, Egg Beaters, tortillas, chilies, salsa and salt, if desired, in medium bowl; pour into prepared dish. Bake in preheated 375°F oven 35 minutes or until set. Remove from oven; sprinkle with remaining cheese and cilantro. Bake 1 minute more or until cheese is melted. Serve with sour cream, if desired.

(I chose to mix all of the loose cheese in the custard, and only used 3 slices of thin cheese for the top, because the custard seemed awfully wet to me and I thought the cheese would help thicken it up. I need not have worried, the tortillas did their job. I'm not sorry I made this adaptaton, however. The filling was light and fluffy and just cheesy enough without melting into goo. I used an 8x16 inch pan so it was thinner, which made it cook and set more easily. I don't feel it required any sour cream -- skipped it).

Verdict: Seriously delicious
Skill: Not much (as if anything on this blog would require skill)
Repeat: Absolutely
Use It Up Factor: High. Used up stale tortillas, egg beaters, canned chilis, a few spoons of salsa left in a tub, and an oldish can of evaporated milk. Only the cheese was a recent purchase.

Nutritional Stats, compiled using my adaptations, and cut into 10 portions (cut the 16inch pan down the center, long direction, and then across, 4 times, for 10 pieces)

Calories 102.3 per serving
Fat 5.5 g
Cholesterol 18.2 mg
Sodium 187.4 mg
Potassium 203.4 mg
Carbohydrate 4.8 g
Dietary Fiber 0.2 g
Sugars 3.8 g
Protein 8.4 g

Saturday, July 26, 2008

French Toast and Sausage


My Mother was recently talking to my oldest brother about his high school years. I don't remember what prompted the conversation, but she asked him for his favorite or best high school memory. His answer, without hesitating first, was "The field trip lunches." Whenever we went on school outings and field trips, Mom would pack us elaborate lunches that included extra-special touches that didn't appear on normal school days. As if getting the day off to take a bus to Golden Gate Park in San Francisco or an Amusement Park or Swimming Pool wasn't fun enough, we'd unpack more than just a lunch -- it was a Child's Dream Picnic.

I remember those lunches of course, but that conversation prompted an examination of own food memories. Forget my high school memories. As soon as my brother mentioned lunches, I began to think what my favorite FOOD memories were, growing up.

My answer came just as quickly: Breakfast.

Breakfast at home, breakfast out while running errands. Breakfast next to a river for day camping, breakfast at the beach while on vacation.

Breakfast was a big deal in our family, and we had wonderful home cooked breakfasts every weekend. Weekdays were cereal and fruit, sometimes toast, but seldom the Full Monty. That came on the weekend when everyone joined in our big dining room. Eggs cooked over easy, toast, bacon, sausages, cinnamon rolls, boxed donuts, sometimes pancakes, and usually whipped orange juice. We had one of those vintage ice cream shake mixers on the counter and we'd throw in the orange juice and whip it until it was frothy.

When we went on vacation, we'd usually have a vacation rental house at the beach and my poor mother -- she gets to go on vacation and what is she doing? Making eggs and bacon in some other person's ill-equipped kitchen with funky bent frying pans and no spatula. Some mornings we'd get up early and go down to the beach and start a fire in one of those beach-side grills when it was still chilly and foggy, and make eggs and fried ham.

I remember once taking just a Day Trip up into the woods, when we lived in Colorado. We were surrounded by Aspens on a beautiful Rocky Mountain morning, and my father set up a green, folding, propane Coleman camp stove, and my mother fried eggs and ham and pancakes next to an ice cold rushing river. We placed a whole cantaloupe in a little eddy in the rocks to get it chilled, and the water washed away my Mom's melon. Off we went, trying to chase that melon down the rapids so it didn't get away from our breakfast. I remember kids screaming and laughing, chasing a bobbing melon while smelling food cooking.

Breakfast was always was a happy event for me. If we were at home, it meant the weekend was here. We'd usually run errands to thrift stores or hardware stores for Dad's weekend project supplies (which I strangely loved), go shopping or swimming, or just play. If we were on vacation, it meant the perfect start of a perfect day at a perfect beach in a perfect week.

One of the knacks my mother had, when she cooked our weekend breakfasts at home, was to give us the impression that certain entrees were Special Occasion only. I didn't really understand this until I was an adult, but I had it exactly backwards as a child. The normal breakfast was the special event -- laboriously frying up an entire pound of bacon for a family of six, an entire dozen eggs over easy, and then toasting half a loaf of bread, and bringing it all to the table at the same time, HOT -- or goodness, the sheer number of pancakes she had to make for a family of six -- that was the labor of love.

What I considered special, however, was the French Toast and Italian Sausage meal. My mother didn't take out a loaf of sandwich bread and just dip and fry perfect square slices. No, when we had French Toast, it was because she had a stale loaf of french bread -- usually a baguette -- left over from diner the night before. She'd bake these thick, small slices of eggy bread, butter and dust them with powdered sugar, and then give us a thick, brown piece of Italian Sausage. This couldn't be more simple and short-cut, because the entire pan of baguette slices and sausage baked and came to the table at the same time on a tray. EASY, right? THIS was my favorite, and I realize I overlooked how hard the others mornings had been. We'd oooh and ahhh and exclaim "French Toast! Our favorite!" and she'd must smile. Frankly, I'm glad she figured out a way to use up stale bread and give herself a much-needed break.

We didn't fuss around with silly things like Chocolate Chip Pancakes or Blueberry French Toast or Apple Cinnamon anything. That's not breakfast, that's silliness. We didn't feel neglected in any way by this. In fact, we probably felt we had better taste than anyone who would ruin French Toast by stuffing it with cream cheese or peanut butter.

When we did have French Toast or pancakes, we always had the same toppings. Butter, maple syrup, and a dusting of powdered sugar. You really don't need anything else. Leave the berries, whipped cream, and foolishness to the restaurants. In fact, even now when I see huge portions of French Toast cut into triangles from Texas Toast or large slices of bread, slathered in some gooey fruit sauce, I think it's gauche. It needs to be small, oval pieces of baguette or isn't "right."

The most remarkable thing about my mother's wonderful home cooked meals (with a few exceptions -- there are meals every child is bound to feel offended by), hearty, and cooked and served graciously, was this: My mother doesn't like to cook. She never let that affect the meals she served to her family, but she never minded taking a day off, either, if my Dad suggested we go out. Pity she got so few days off, even on vacation.

Here's to you, Mom. Breakfast with you is still my favorite meal.

Sunday, May 25, 2008

Dutch Baby for One


I'm hopeless at making pancakes. Always have been, always will be. I don't get the batter right. I turn them too soon, or not soon enough. I'm told to watch for "dry looking edges" and then flip, and when I do, the underside is either not browned, or has mottled black spots. I'm told to look for air bubbles having popped through, and then flip. Same result. My pan is too hot, or not hot enough. Oh fiddle. I just don't make them anymore. Waffles, occasionally, will make into my rotation because they are cooked in a waffle maker and I open the lid when it dings. But not pancakes.

Today, however, I decided I'd try a German Pancake -- a Dutch Baby. I remember my mother making them when I was teen -- but only when we had company over for breakfast. I'm surprised this was considered only "company fare" because there is no greasing of the griddle, no lifting the edges of the pancake to see if it was anything close to diner-style brown, no standing and cooking in batches. With four kids, I'm surprised we didn't see a big puffy pancake more often.

With this recipe for one, I knew I could try it in my toaster oven and do nothing but stare. There would be no scooping and pouring of spoonfuls of batter onto a griddle, tearing off and eating the brown edges of the previous failed pancake*, scowling. With the Dutch Baby, you pour it all in at once and leave it be until it's time to say "Taa dahhh!"

So how was it? Perfection, I tell you! I actually giggled out loud whilst staring into my little toaster oven. This was so easy, I may actually try making popovers.

Dutch Baby for One

PANCAKE
1/4 cup flour
1/4 cup fat free milk
1 egg
Dash of nutmeg
1 pat of butter

TOPPINGS
1-2 tablespoons of jam or syrup
Powdered Confectioners Sugar
Lemon

Heat your oven to 450 degrees and ready an oven proof skillet by heating it in the oven. In a mixing bowl, combine the flour, milk, egg, and nutmeg, beating to combine. Let the prepared batter sit a moment while you take the hot pan out of the oven, and quickly add butter to melt and swirl in the bottom and up the sides of the pan. I used a 6 inch personal cast iron skillet ($1.00 from Goodwill -- Score!), and one pat of butter was plenty. Try not to brown it. When coated, pour the contents of the batter into the pan, swirl it lightly to coat the bottom of the pan, and put in your hot oven for approximately 15 minutes, until well puffed with very brown edges.

Remove and serve immediately -- have your toppings ready because while this puffs up dramatically, it also deflates quickly. Quickly sprinkle with confectioners sugar, lemon juice, and top as desired with fruit or jam. I used a bit of sugar, a lot of lemon juice, and a dollop of Sour Power Cherry Rhubarb jam.

"As God is my witness, I'll never burn pancakes again!"

*Actually, I see a lot of pancakes on Tastespotting that look exactly like my "failures." Browned edge rings, but not an even amount of brown across the surface, etc. These are rejects, to me. When I was 8 years old, my family was driving late at night through Provo, Utah, with a car full of hungry kids and the only restaurant open was Bob's Big Boy. I had a plate of pancakes. They were unusually and deeply yellow, an even, perfect brown from edge to edge, and as big as dinner plates. They were so good, and I was so hungry, that this pancake became the standard by which I judge all pancakes.

Calories 306.0 Fat 9.5 g Carbohydrate 42.4 g Fiber 1.1 g Sugars 11.0 g Protein 11.7g

Saturday, April 12, 2008

Mini Brioche French Toast

So Damn Good

Mini Brioche French Toast

Looks like a huge plate of it, doesn't it? Nope! Made with a leftover brioche dinner roll.

1 small brioche dinner roll
1 egg
1 teaspoon fat free half and half
1 dash of nutmeg
2 pats of butter spread
2 tablespoons sugar free maple syrup
1 teaspoon powdered sugar

Beat the egg, half and half, nutmeg and any other spices you like, slice the brioche dinner roll and dip into egg custard, and sautee in a pat of butter spread until golden brown. Top with another pat of butter spread and SF maple syrup.

My friend Dottie in PA has always recommended the sugar free maple syrup from the East Coast based Waffle House chain. I found a bottle online and purchased it, and boy, was she right. That stuff is just plain AWESOME. No fake flavor whatever, and no nasty after-effects of the sugar alcohols.

As soon as my bottle is gone, Dottie, I'm afraid I'll need to send you on an errand. :)

Saturday, April 5, 2008

Low Fat Lemon Blueberry Muffins


I suck.

I complain about muffin flavors pretty much every time my boyfriend and I visit a coffee shop. You visit a coffee shop or bakery, you want a muffin for breakfast, and you are always presented with the same boring flavors:

Apple Cinnamon (my least favorite)
Blueberry (works in a pinch, but it's not inspired)
Chocolate (who are we kidding, it's a cupcake)
Banana Nut
Bran
Lemon Poppyseed (occasionaly makes an appearance)
Carrot (occasionaly makes an appearance)

Where are the interesting flavor combinations? Where are the coconut and pineapple muffins (the best muffin I ever had in my life was in the Kansas City airport; light as a feather, bits of pineapple, coconut, and I think mac nuts -- it was ethereal), the apricot chutney muffins? The curried cranberry and pecan muffins? The Cherry Vanilla? It's so easy to use some flavor imagination, and yet no breakfast joints break out of that muffin rut. They can dumb down to popular choice. Fooey on popular choice.

I recently purchased a couple of muffin cookbooks from a thrift store (because with more than 100 cookbooks, I didn't have nearly enough, and I'm positive not a single one of those 100+ cookbooks had any muffin recipes in them so I needed these new books), and set about finding some interesting flavors. They were to be had, for sure.

So what did I do? What mold did I shatter with my gourmet muffin madness?

I made Lemon Blueberry, because I had blueberries on hand, and some meyer lemons.

As I said ... I suck.

LOW FAT LEMON BLUEBERRY MUFFINS

1 - 3/4 cup all-purpose flour
1/2 cup sugar
2 - 1/2 teaspoons baking powder
3/4 teaspoon salt
3/4 cup low fat milk
1/3 cup canola oil
1 egg, beaten
1 teaspoon lemon extract or 2 tablespoons lemon juice
1 cup blueberries
2 tablespoons sugar
1 teaspoon grated lemon rind
1/4 cup of Meyer Lemon Simple Syrup (optional)

Combine first four dry ingredients in a large mixing bowl and make a well. In a seperate bowl, beat wet ingredients (except blueberries) until thoroughly blended, and pour into the well in the flour mixture. Mix very gently until moistened. Toss blueberries with 2 tablespoons of sugar, and add to batter. Sprinkle with lemon zest, and mix very gently to incorporate the berries. I spooned the batter into paper lined mini muffin tins. Bake at 400 degrees F for 14 minutes or until muffins are golden brown.

Optional step: When the muffins were fresh and hot, I brushed them with Meyer Lemon Simple Syrup to glaze the tops.

Verdict: Tasty, but not very interesting. The muffins stuck to the paper -- I think next time I'd spoon them into a greased tin. Also, next time I'll break out some peaches and ginger and go for broke with new flavors.
Skill: None.
Repeat: Who am I kidding? Probably yes. Blueberry is the boyfriend's favorite and he's a) younger and b) cuter than I am, so I am a slave to his every whim.